1. Click 'Import Image' button or the menu File --> Import --> Image Files
2. Follow the instructions of the import wizard.
Additional information on lane extraction
GelQuest can extract the lanes from gel images and converts them into trace profiles. During
this process two individual gel lanes are combined into a single sample. The first lane is a
sample lane and the second lane is a marker lane from the gel image. Only one lane of the
gel image can be defined as a marker lane. The marker lane will later used to size the
fragments of the sample lane.
Please note:
Five steps are needed to extract the lane data from an image. The parameters of each step
are automatically saved in an XML file in the same directory as the image. For example, if you
are extracting the lanes from an image file "test.jpg" the XML file containing all step
parameters is saved as "test.XML". If you re-import the image file "test.jpg" all previously
defined step parameters are available. In each step you can reset the saved parameters.
There meaning of the buttons in the tool bar at the top of the window is as follows:
Previous Button
Click to jump to the previous step in the lane extraction process.
Next Button
Click to jump to the following step in the lane extraction process.
Reset button
A click on the 'Reset' button resets all parameters of the current lane extraction step to default
values.
The zoom buttons
To zoom in our zoom out use these two buttons or the mouse wheel (wheel down = zoom in,
wheel up = zoom out).
And now for the steps:
1. Step: Define the region of interest
Move the corners with the mouse to select the region of interest. It should contain all lanes
that are to be extracted. This step will re-calculate the image in that way that the four corners
of the region of interest will become the corners of a new rectangle. Two following two
conditions are important:
· Two opposite edges of the region of interest must run parallel to the first and the last lane, respectively.
· The other two edges must be set in that way that equivalent bands (with
approximately the same fragment length) in the first and last lane are in the same
distance to these edges. This is because GelQuest will correct for circular smile
effects in a subsequent processing step only.
The following examples illustrates for the same source image how to set the region of interest
in the correct way and how to do it in a wrong way.
Region of interest
Result:
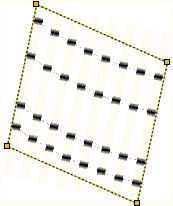
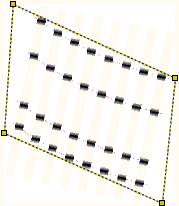
Example 1:
This example shows
how to set the region of
interest in the right way.
Note, that the left and
the right side are those
sides that run parallel to
the first and last gel
lane.
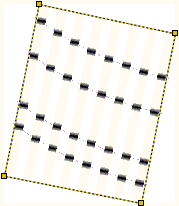
Example 2:
Here the region of
interest is defined in a
wrong way:
Equivalent bands in the
first and the last lane are
not in the same distance
to the two other edges
of the rectangle. The
resulting image is shown
on the right side.
GelQuest will not correct this kind of
smile effect properly.
Example 3:
Wrong: The two edges
are not parallel to the
run direction of the
lanes.
GelQuest could correct the smile effect
but the run direction is not set in the
right way.
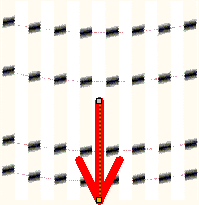
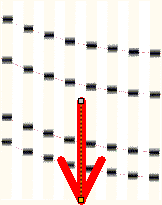
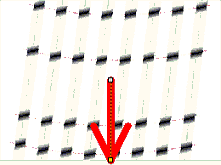
2. Step: Adjust the run direction
Locate the gel region containing the shortest fragments (those ones that have run as the
fastest through the gel) and click with the mouse near that gel edge. The arrowhead should
point into the direction of the shortest fragments. So it will show the run direction.
3. Step: Define individual trace lanes
Move the mouse pointer over the center of a lane and click with the left mouse button. Repeat
for each lane that is to be extracted. The size standard lane should also be selected.
Please note: Best results are obtained if you select the leftmost and rightmost lane first.
Center the grid point handles on the lanes. Then select the most distorted lanes and adjust
their grid point handles. Each further lane is automatically fitted between already defined
lanes.
Right mouse clicks will undo the last lane definition.
4. Step: Correct a possible smile effect in the gel image
Move the handles with the left mouse button pressed and adjust the grid lines to run parallel
to the smiling bands.
5. Step: Define the size standard lane
Click on the lane that contains the size standard. This lane will be added as the second color
channel to each extracted sample.